
概览
KuiperInfer(项目地址)是一个开源的深度学习推理引擎,感谢作者提供这个项目供大家学习。本文分享一下我对这个项目的理解,欢迎交流。
训练好的深度学习模型,需要通过推理框架部署到不同的设备上,高效完成模型推理,服务应用场景。与训练框架不同的是,深度学习推理框架没有梯度反向传播功能,因为算法模型文件中的权重系数已经被固化,推理框架只需要读取、加载并完成对新数据的预测即可。
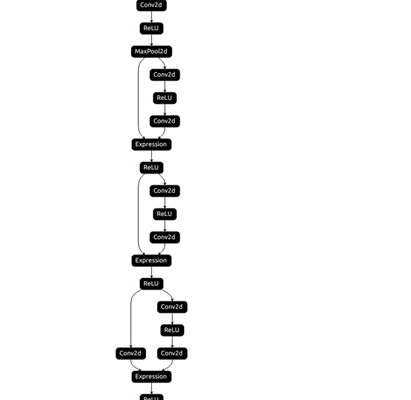
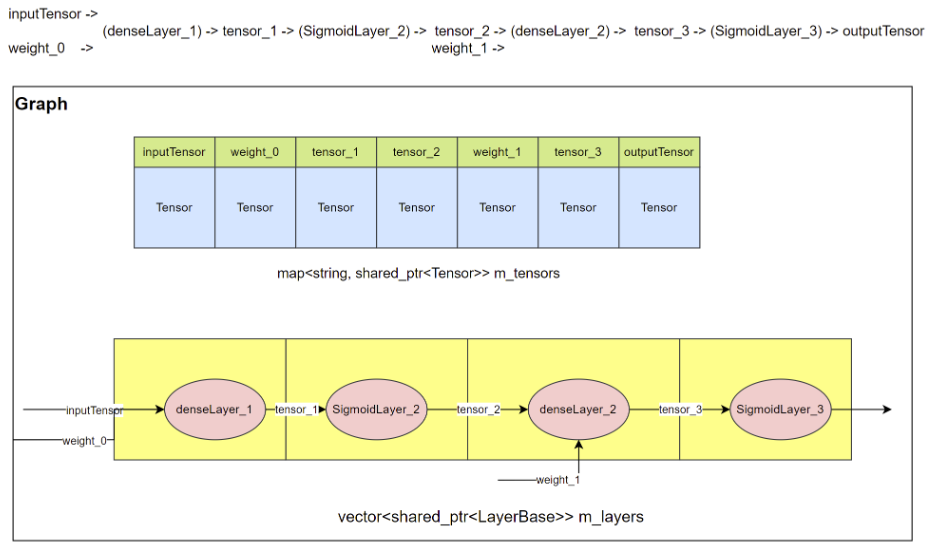
KuiperInfer的整体流程如下图所示:
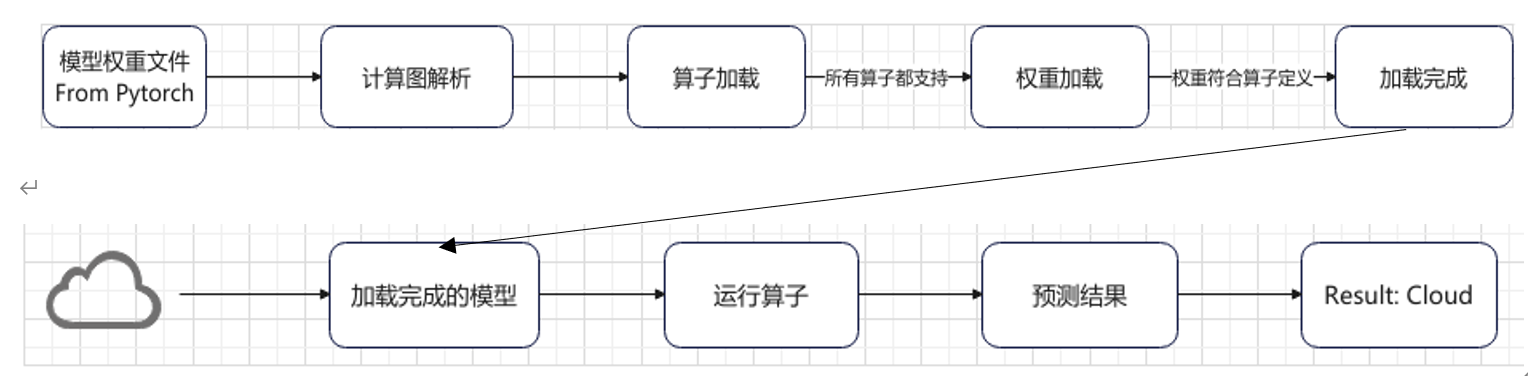
下面介绍下KuiperInfer的核心模块。
张量
张量是存储数据(例如输入、输出、系数或参数)的主要容器。张量是一种递归和自包含的定义,比如:4维Tensor由N个3维Tensor组成,3维Tensor由N个2维Tensor组成,2维Tensor由N个1维的Tensor组成,1维Tensor由N个0维Tensor组成,0维Tensor维为标量。
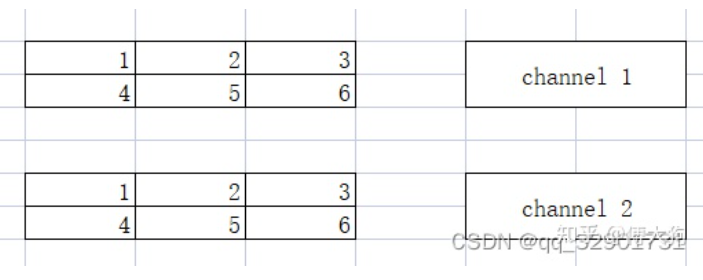
典型的图像数据RGB为3维Tensor,RGB数据的保存方式有RGBRGBRGB….或者 RRR…GGG…BBB…,即NHWC或者NCHW,如下图所示。KuiperInfer采用的是NCHW格式(NCHW分别表示批次、通道和高宽)。

Arma::Cube
Armadillo是一个接口友好,高性能的线性代数库,底层可以调用OpenBlas、MKL。
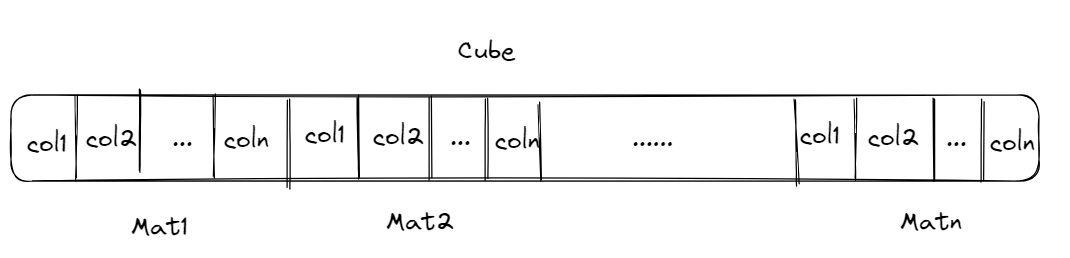
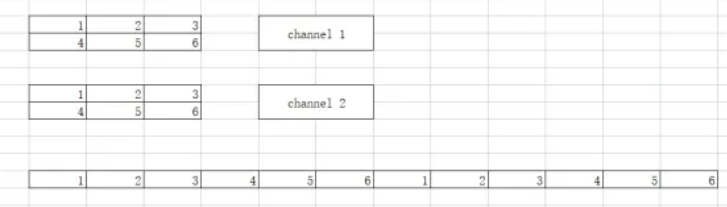
KuiperInfer的张量以Armadillo类中的cube(三维矩阵)作为数据的container,在cube之上实现了Tensor的接口,一个cube由多个mat(二维矩阵)在内存中连续存储组成。张量是逻辑上的多维数组,底层数据结构为一维数组(内存连续)。
mat是列主序的,也就是同一列数据存放在内存中相邻的位置。因此cube的数据存储大致如下图所示:
成员变量
 private:
  arma::fcube data_;                  // 张量数据
  std::vector<uint32_t> raw_shapes_;  // 张量的实际尺寸,可以通过raw_shapes_的长度判断张量是几维的
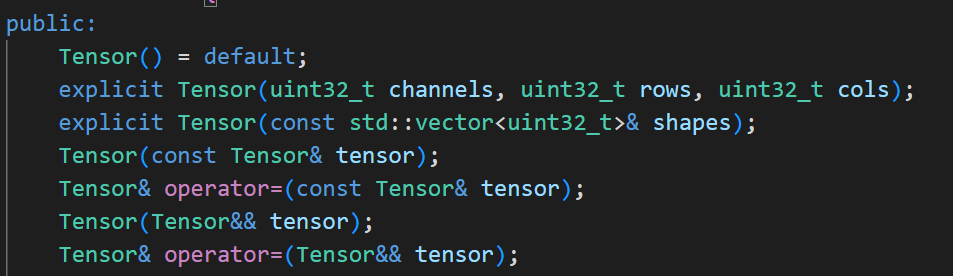
构造、拷贝构造、赋值拷贝、移动构造、移动赋值
成员函数
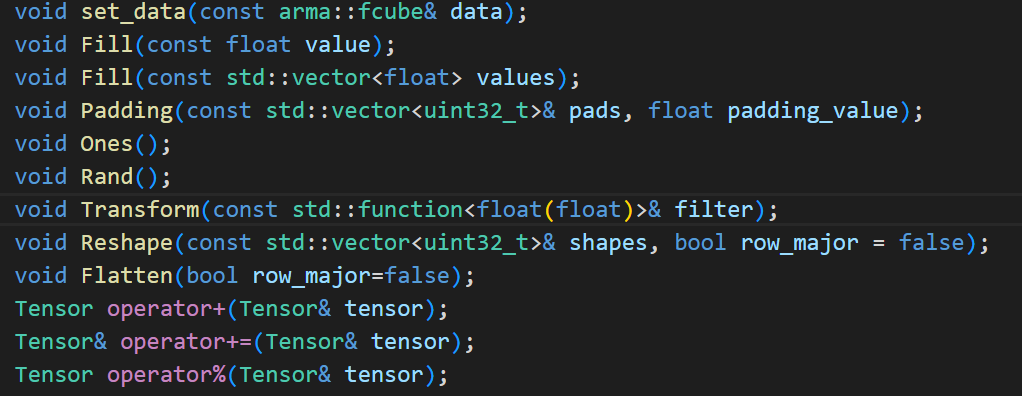
张量类提供的数据读取方法有:
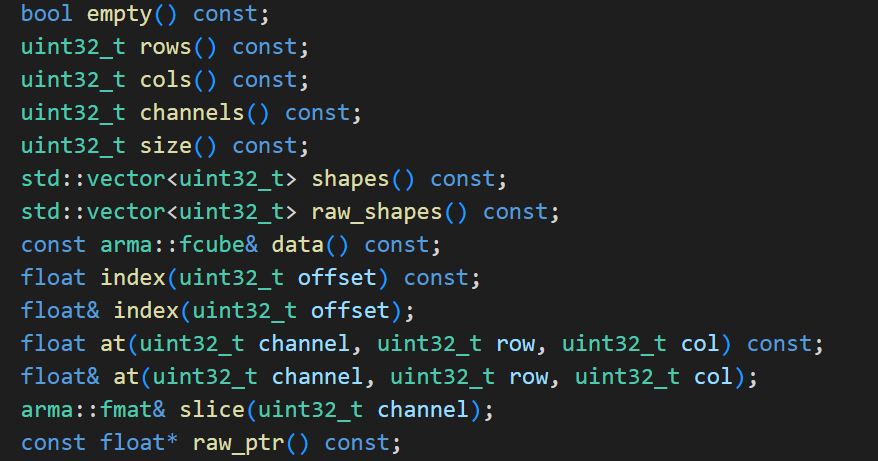
提供的数据操作方法有:
列主序
arma::cube列主序的特性会影响很多对Tensor的操作,例如Fill()方法:以values中的数据去填充Tensor。如果将的一组数据[0,1,2,3,4,5,…,15]填充到一个大小为4×4的Tensor中。默认情况下填充的结果是这样的

如果想要实现行主序的填充效果,需要对填充结果进行转置。

还有Reshape方法(调整tensor的形状),默认的reshape结果是这样的:

如果想要实现行主序的reshape,只能通过位置计算的方式来对元素进行逐个搬运。
void Tensor<float>::ReView(const std::vector<uint32_t>& shapes) {
  CHECK(!this->data_.empty());
  const uint32_t target_channels = shapes.at(0);
  const uint32_t target_rows = shapes.at(1);
  const uint32_t target_cols = shapes.at(2);
  CHECK_EQ(this->data_.size(), target_channels * target_cols * target_rows);
  arma::fcube new_data(target_rows, target_cols, target_channels);

  const uint32_t matrix_size = target_rows * target_cols;
  // 逐个元素遍历原tensor
  for (uint32_t c = 0; c < this->data_.n_slices; ++c) {
    const arma::fmat& channel = this->data_.slice(c);
    // 先遍历列,再遍历行:因为是列主序的,同一列数据在内存中连续
    for (uint32_t w = 0; w < this->data_.n_cols; ++w) {
      const float* col_ptr = channel.colptr(w);  // Obtain a raw pointer to the memory used by elements in the specified column
      for (uint32_t h = 0; h < this->data_.n_rows; ++h) {
        // index:按照行优先顺序
        const uint32_t pos_index = c * data_.n_rows * data_.n_cols + h * data_.n_cols + w;
        // 调整后的元素下标
        const uint32_t ch = pos_index / matrix_size;
        const uint32_t row = (pos_index - ch * matrix_size) / target_cols;
        const uint32_t col = (pos_index - ch * matrix_size - row * target_cols);
        CHECK(ch < new_data.n_slices && col < new_data.n_cols && row < new_data.n_rows);
        new_data.at(row, col, ch) = *(col_ptr + h);
      }
    }
  }
  this->data_ = std::move(new_data);
}
张量间运算
深拷贝
std::shared_ptr<Tensor<float>> TensorClone(std::shared_ptr<Tensor<float>> tensor){
    return std::make_shared<Tensor<float>>(*tensor);
}
Broadcast
简化版本
std::tuple<sftensor, sftensor> TensorBroadcast(const sftensor& tensor1, const sftensor& tensor2){
    CHECK(tensor1 != nullptr && tensor2 != nullptr);
    if (tensor1->shapes() == tensor2->shapes()) {
        return {tensor1, tensor2};
    } else {
    CHECK(tensor1->channels() == tensor2->channels());    // channel数量要一致
    if (tensor2->rows() == 1 && tensor2->cols() == 1) {
      sftensor new_tensor =
          TensorCreate(tensor2->channels(), tensor1->rows(), tensor1->cols());
      CHECK(tensor2->size() == tensor2->channels());
      for (uint32_t c = 0; c < tensor2->channels(); ++c) {
        new_tensor->slice(c).fill(tensor2->index(c));
      }
      return {tensor1, new_tensor};
    } else if (tensor1->rows() == 1 && tensor1->cols() == 1) {
      sftensor new_tensor =
          TensorCreate(tensor1->channels(), tensor2->rows(), tensor2->cols());
      CHECK(tensor1->size() == tensor1->channels());
      for (uint32_t c = 0; c < tensor1->channels(); ++c) {
        new_tensor->slice(c).fill(tensor1->index(c));
      }
      return {new_tensor, tensor2};
    } else {
      LOG(FATAL) << "Broadcast shape is not adapting!";
      return {tensor1, tensor2};
    }
  }
}
加法
std::shared_ptr<Tensor<float>> TensorElementAdd(const std::shared_ptr<Tensor<float>>& tensor1,
    const std::shared_ptr<Tensor<float>>& tensor2){
        CHECK(tensor1 != nullptr && tensor2 != nullptr);
        if (tensor1->shapes() == tensor2->shapes())
            return std::make_shared<Tensor<float>>(*tensor1 + *tensor2);
        else {
            // broadcast
            CHECK(tensor1->channels() == tensor2->channels())<< "Tensors shape are not adapting";
            const auto& [input_tensor1, input_tensor2] =
                TensorBroadcast(tensor1, tensor2);
            CHECK(input_tensor1->shapes() == input_tensor2->shapes());
            return std::make_shared<Tensor<float>>(*input_tensor1 + *input_tensor2);
        }
}
乘法
std::shared_ptr<Tensor<float>> TensorElementMultiply(const std::shared_ptr<Tensor<float>>& tensor1,
    const std::shared_ptr<Tensor<float>>& tensor2){
        CHECK(tensor1 != nullptr && tensor2 != nullptr);
        if (tensor1->shapes() == tensor2->shapes())
            return std::make_shared<Tensor<float>>(*tensor1 % *tensor2);
        else {
            // broadcast
            CHECK(tensor1->channels() == tensor2->channels())<< "Tensors shape are not adapting";
            const auto& [input_tensor1, input_tensor2] =
                TensorBroadcast(tensor1, tensor2);
            CHECK(input_tensor1->shapes() == input_tensor2->shapes());
            return std::make_shared<Tensor<float>>(*input_tensor1 % *input_tensor2);
        }
}
加载csv文件生成矩阵
遍历两遍,第一遍遍历得到行数和列数,这样才能分配arma::fmat的空间,第二遍遍历加载数据到arma::fmat。
class CSVDataLoader {
 public:
  static arma::fmat LoadData(const std::string &file_path, char split_char = ',');

 private:
  // 得到csv文件的尺寸大小,LoadData中根据这里返回的尺寸大小初始化返回的fmat
  static std::pair<size_t, size_t> GetMatrixSize(std::ifstream &file, char split_char);
};
计算图
计算图是神经网络的中间表达。计算图根据训练好的神经网络结构,将张量(Tensor)和计算节点(Operator)有效的组织和连接形成一个整体,形成一个有向无环图(DAG),并描述如何将输入的数据通过各种层进行运算得到输出。
PNNX
PNNX (PyTorch Neural Network eXchange)为PyTorch提供了一种开源的模型格式,它定义了与Pytorch相匹配的数据流图和运算图。Pytorch训练好一个模型之后,模型可以转换到pnnx格式文件,通过读取pnnx格式文件,形成计算图。
ONNX作为最广泛应用的模型中间表达,具有以下一些问题:
ONNX以protobuffer作为模型表达的文件格式,对数据传输友好,但是可读性不友好,很难直接修改计算图- 算子的定义和
PyTorch不完全兼容,需要用很多小算子去拼接,使得计算图变得过于复杂,同时降低推理效率 - 因为
ONNX要适配不同的深度学习框架,添加了大量的参数,增加了开发者负担
PNNX具有以下特性:
-
模型文件用户可读,容易修改
7767517
4 3
pnnx.Input      input       0 1 0
nn.Conv2d       conv_0      1 1 0 1 bias=1 dilation=(1,1) groups=1 in_channels=12 kernel_size=(3,3) out_channels=16 padding=(0,0) stride=(1,1) @bias=(16)f32 @weight=(16,12,3,3)f32
nn.Conv2d       conv_1      1 1 1 2 bias=1 dilation=(1,1) groups=1 in_channels=16 kernel_size=(2,2) out_channels=20 padding=(2,2) stride=(2,2) @bias=(20)f32 @weight=(20,16,2,2)f32
pnnx.Output     output      1 0 2
算子跟PyTorch Python API完全对应

- expression operator
- 完整的算术表达式,阅读方便,减少访存
- 计算图优化
- 支持Pytorch自定义算子
- Tensor shape propagation
- ….
计算节点(RuntimeOperator)、操作数(RuntimeOperand)
为了方便本项目的使用,作者对PNNX的计算图进行了封装。下图展示了PNNX中Operator类和Operand类的主要属性。
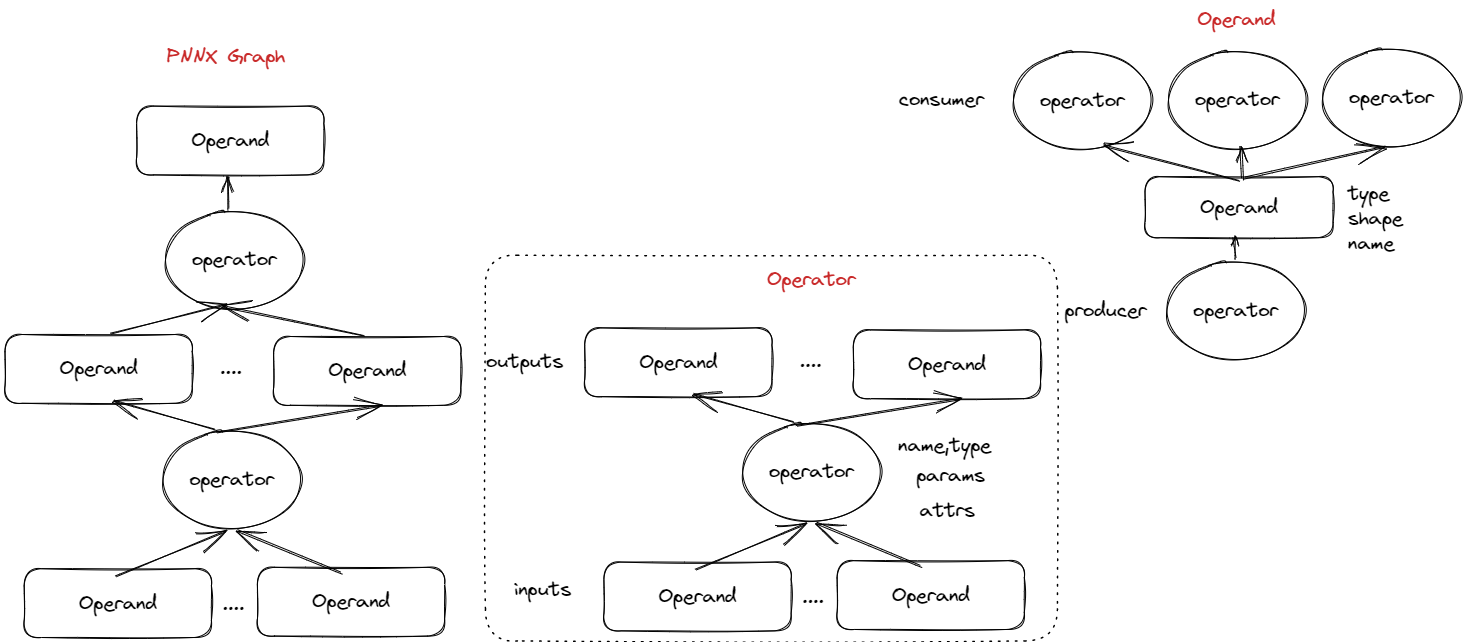
经过封装之后的RuntimeOperator类和RuntimeOperand类的主要属性如下:
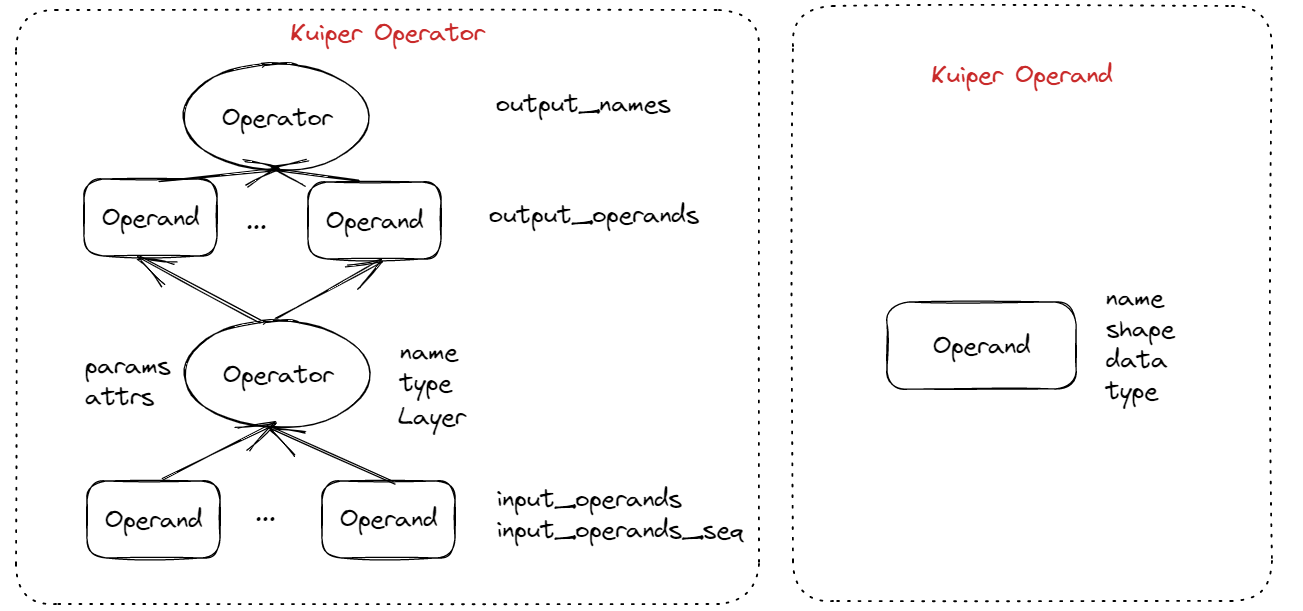
计算节点是计算图中的一个节点,用来执行特定计算。如Relu,卷积、池化等。
计算节点主要包含三部分内容:
- 节点的输入、输出数据,节点的参数(如卷积核的大小),节点的权重(如卷积核的weight、bias)等;
- 后继计算节点;
- 层(Layer): 计算过程的具体执行者
RuntimeOperator类设计如下:
struct RuntimeOperator{
    virtual ~RuntimeOperator();
    std::map<std::string, std::shared_ptr<RuntimeOperand>> input_operands;    // 输入操作数
    std::vector<std::shared_ptr<RuntimeOperand>> input_operands_seq;          // 输入操作数,按顺序排列
    std::shared_ptr<RuntimeOperand> output_operands;     // 输出操作数
    std::vector<std::string> output_names;                                      // 后继节点的名称
    std::map<std::string, std::shared_ptr<RuntimeOperator>> output_operators;   // 后继节点
    std::string name;   // 计算节点的名称
    std::string type;   // 计算节点的类型
    std::shared_ptr<Layer> layer;  /// 计算节点对应的计算Layer
    bool has_forward = false;   // 标记是否已经遍历,用于拓扑排序和前向推理过程

    std::map<std::string, RuntimeParameter*> params;  /// 计算节点的超参数
    std::map<std::string, std::shared_ptr<RuntimeAttribute>> attribute;  /// 计算节点的属性,包含权重
};
操作数是每个节点的输入和输出数据,RuntimeOperand类设计如下:
struct RuntimeOperand{
    std::string name;  // 输出该操作数的计算节点的名字
    std::vector<int32_t> shapes; // 操作数的形状
    RuntimeDataType type = RuntimeDataType::kTypeUnknown; // 操作数的数据类型,一般是float
    std::vector<std::shared_ptr<Tensor<float>>> datas; // batch个数据,每个数据是一个张量
};
构建计算图:RuntimeGraph::Build()
加载PNNX文件,生成计算图
RuntimeGraph graph(param_path, weight_path);
graph_ = std::make_unique<pnnx::Graph>();
int load_result = graph_->load(param_path_, bin_path_);
封装PNNX计算节点,构建Runtime计算节点
计算图的计算节点相关的属性如下:
std::vector<std::shared_ptr<RuntimeOperator>> operators_;   // 计算图的计算节点
std::map<std::string, std::shared_ptr<RuntimeOperator>> operators_maps_;   // 所有的计算节点,根据唯一的name索引
主要通过下面的方法对这两个属性进行了初始化:
// 初始化计算节点的输入操作数:input_operands,input_operands_seq
InitGraphOperatorsInput();
// 初始化计算节点的后继节点(们)的名称:output_names
InitGraphOperatorsOutput();
// 初始化计算节点的模型权重:attribute
InitGraphAttrs();
// 初始化计算节点的超参数:params
InitGraphParams();
关联计算节点的后继计算节点(们)
for (const auto& current_op : operators_) {
    // 遍历当前节点的所有后继节点,通过name检索next_op_name,找到后继节点
    const std::vector<std::string>& output_names = current_op->output_names;
    for (const auto& next_op_name : output_names) {
        if (const auto& next_op_pair = this->operators_maps_.find(next_op_name);
            next_op_pair != this->operators_maps_.end()) {
            current_op->output_operators.insert({next_op_name, next_op_pair->second});
        }
    }
}
创建计算节点对应的Layer
计算节点的计算逻辑包含在Layer类中,根据RuntimeOperator,生产对应的layer,例如:
ReluLayer(relu_op);
SigmoidLayer(sigmoid_op);
.....
layer的类型很多,需要有统一的接口来生产不同的layer(就像下面这样),工厂模式适合这个场景。
const auto& layer = LayerRegisterer::CreateLayer(op);
具体步骤如下:
- 每个Layer通过定义
LayerRegistererWrapper对象来调用RegisterCreator方法:
// 全局变量的初始化在main函数执行之前
LayerRegistererWrapper kSigmoidGetInstance("nn.Sigmoid", SigmoidLayer::GetInstance);

class LayerRegistererWrapper {
 public:
  LayerRegistererWrapper(const std::string &layer_type, const LayerRegisterer::Creator &creator) {
    LayerRegisterer::RegisterCreator(layer_type, creator);
 }
RegisterCreator方法通过维护一个的静态的注册表来注册layer。注册表全局唯一(单例模式),是一个Map,key是layer的名字,value是用于创建该层的方法(Creator)。
typedef ParseParameterAttrStatus (*Creator)(const std::shared_ptr<RuntimeOperator> &op,
std::shared_ptr<Layer> &layer);
typedef std::map<OpType, Creator> CreateRegistry;
void LayerRegisterer::RegisterCreator(const std::string &layer_type,
const Creator &creator) {
CHECK(creator != nullptr);
CreateRegistry ®istry = Registry();
CHECK_EQ(registry.count(layer_type), 0)
<< "Layer type: " << layer_type << " has already registered!";
registry.insert({layer_type, creator});
}
LayerRegisterer::CreateRegistry &LayerRegisterer::Registry() {
static CreateRegistry *kRegistry = new CreateRegistry();
CHECK(kRegistry != nullptr) << "Global layer register init failed!";
return *kRegistry;
}
- 最后,只需要传入对应的
RuntimeOperator,调用CreateLayer方法就可以生成对应的Layer,十分优雅。
std::shared_ptr<Layer> LayerRegisterer::CreateLayer(
const std::shared_ptr<RuntimeOperator> &op) {
CreateRegistry ®istry = Registry();
const std::string &layer_type = op->type;
const auto &creator = registry.find(layer_type)->second;
std::shared_ptr<Layer> layer;
const auto &status = creator(op, layer);
return layer;
}
预分配计算节点的输入和输出空间
根据计算节点的输入操作数的shapes,可以在计算图执行之前提前分配好内存空间。
RuntimeOperatorUtils::InitOperatorInput(operators_);
RuntimeOperatorUtils::InitOperatorOutput(graph_->ops, operators_);
output_operand->datas.push_back(TensorCreate(1, operand_shapes.at(1), operand_shapes.at(2)));
由于每个节点的输入就是上一层节点的输出,因此除了输入节点之外,其他节点的输入可以复用它上一层节点的输出空间。
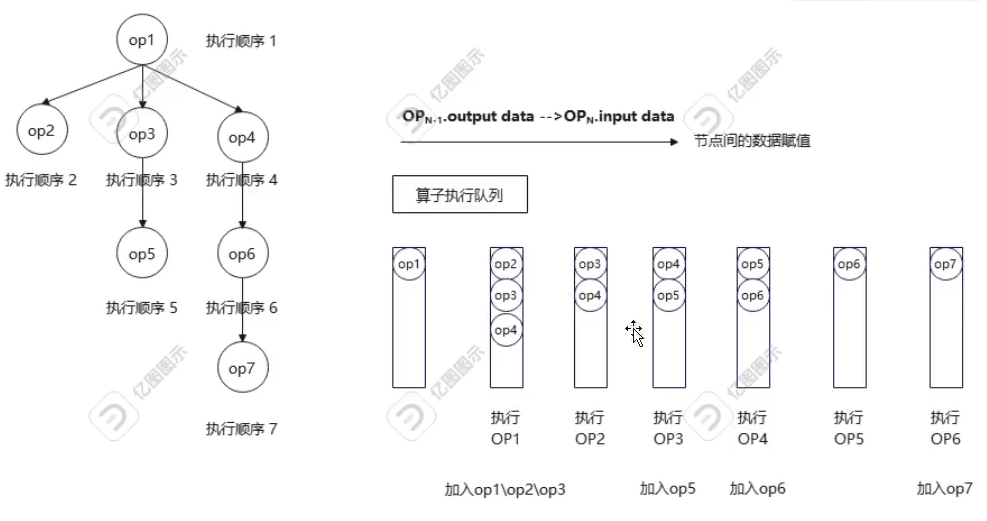
对计算节点进行拓扑排序
-
每个计算节点必须要等它依赖的节点完成计算,才能进行计算,是一个拓扑排序的过程。也就是进行广度优先遍历,通过一个队列维护要遍历的计算节点,当某个计算节点的前驱节点都已加入队列中,则将该节点也加入到队列中。
// 从输入节点开始
for (const auto& [_, op] : operators_maps_) {
    if (op->type == "pnnx.Input" && !op->has_forward) {
      ReverseTopo(op);
    }
}

// 生成(反向的)拓扑排序
void RuntimeGraph::ReverseTopo(const std::shared_ptr<RuntimeOperator>& root_op) {
    CHECK(root_op != nullptr) << "current operator is nullptr";
    root_op->has_forward = true;
    const auto& next_ops = root_op->output_operators;
    for (const auto& [_, op] : next_ops) {
      if (op != nullptr) {
        if (!op->has_forward) {
          ReverseTopo(op);
        }
      }
    }
    for (const auto& [_, op] : next_ops) {
      CHECK_EQ(op->has_forward, true);
    }
    topo_operators_.push_back(root_op);
}

std::reverse(topo_operators_.begin(), topo_operators_.end());
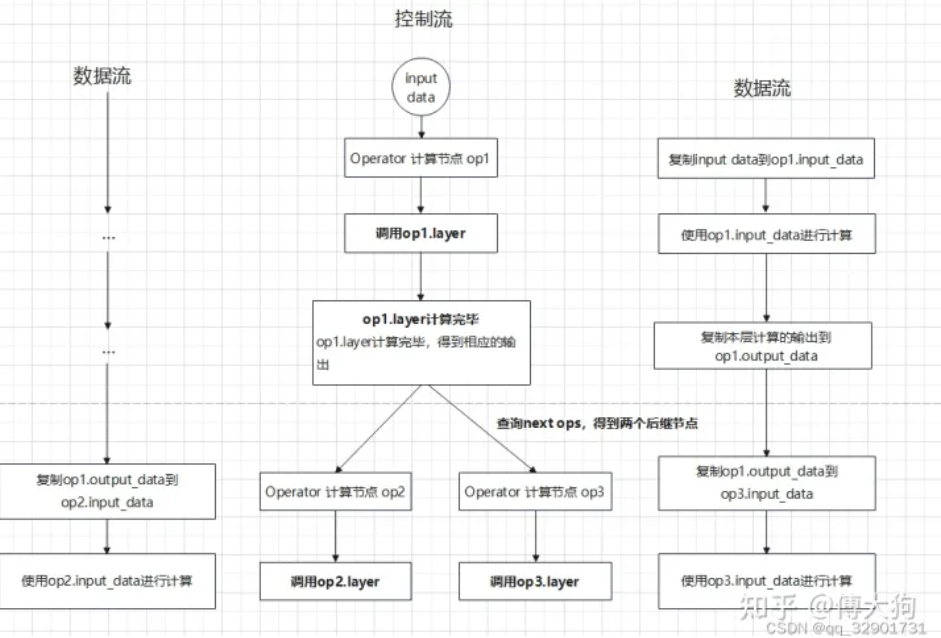
前向推理
-
Graph在执行时在逻辑上可以分为两条路径,一条是控制流,另外一条是数据流。在数据流中,前一个operator产生的输出传递到后继operator作为输入。
std::vector<std::shared_ptr<Tensor<float>>> RuntimeGraph::Forward(
    const std::vector<std::shared_ptr<Tensor<float>>>& inputs, bool debug) {

	...

  for (const auto& op : topo_operators_) {
    op->has_forward = false;
  }

  for (const auto& current_op : topo_operators_) {
    if (current_op->type == "pnnx.Input") {
      current_op->has_forward = true;
      ProbeNextLayer(current_op, inputs);
    } else if (current_op->type == "pnnx.Output") {
      current_op->has_forward = true;
      CHECK(current_op->input_operands_seq.size() == 1);
      current_op->output_operands = current_op->input_operands_seq.front();
    } else {
      InferStatus status = current_op->layer->Forward();
      CHECK(status == InferStatus::kInferSuccess)
          << current_op->layer->layer_name()
          << " layer forward failed, error code: " << int(status);
      current_op->has_forward = true;
      ProbeNextLayer(current_op, current_op->output_operands->datas);
    }
  }

	...
}
void RuntimeGraph::ProbeNextLayer(const std::shared_ptr<RuntimeOperator>& current_op,
    const std::vector<std::shared_ptr<Tensor<float>>>& layer_output_datas) {
  // 当前节点的后继节点
  const auto& next_ops = current_op->output_operators;
  // 对所有后继节点进行遍历
  for (const auto& [_, next_rt_operator] : next_ops) {
    const auto& next_input_operands = next_rt_operator->input_operands;
    // 确定后继节点的输入来自于current_op
    if (next_input_operands.find(current_op->name) != next_input_operands.end()) {
      std::vector<std::shared_ptr<ftensor>>& next_input_datas = next_input_operands.at(current_op->name)->datas;
      CHECK(next_input_datas.size() == layer_output_datas.size());
      // 将当前current_op的输出赋值到next_input_datas中
      for (int i = 0; i < next_input_datas.size(); ++i) {
        next_input_datas.at(i) = layer_output_datas.at(i);
      }
    }
  }
}
参考资料
-
https://github.com/zjhellofss/KuiperInfer
-
https://zhuanlan.zhihu.com/p/593215728
-
https://blog.csdn.net/qq_32901731/category_12176352.html
-
https://gitee.com/cao_fx/KuiperInfer_Better